
Published Video in Under 3 Minutes - How I Built an AI Film Crew on AWS
Mar 30, 2026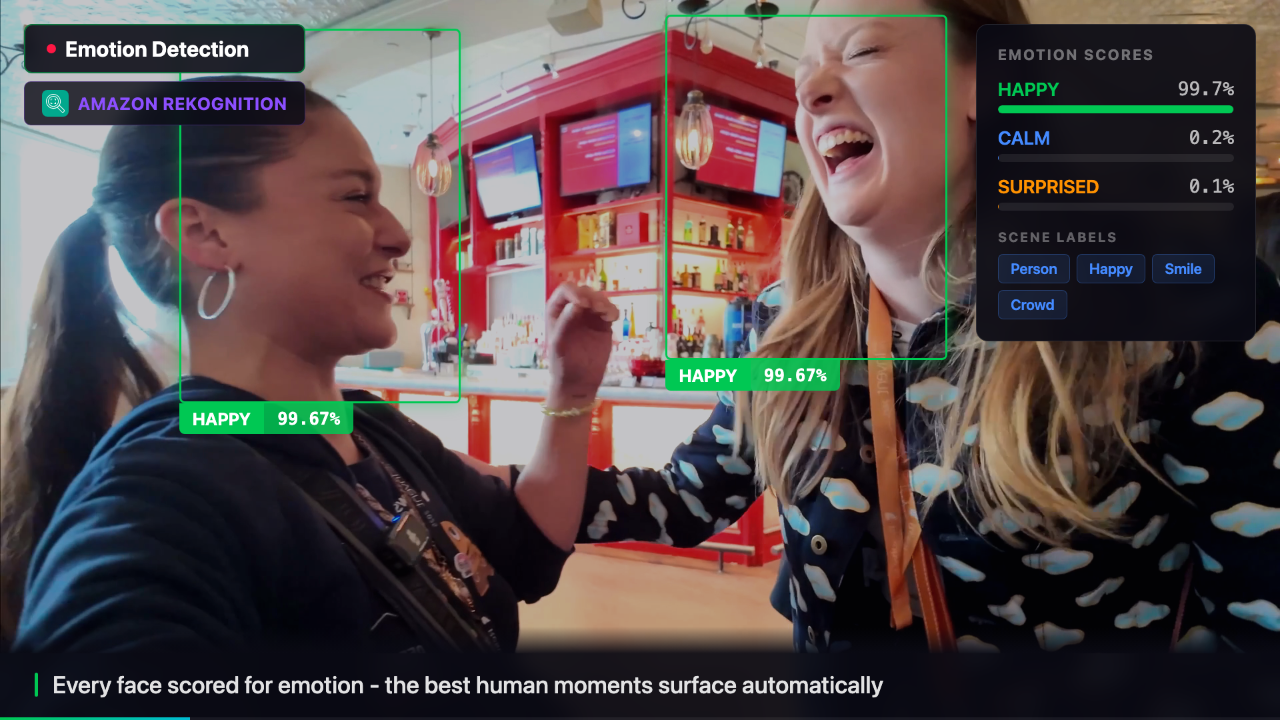
From 493 Unedited Clips to a Published Video in Under 3 Minutes
I came home from re:Invent with 493 unedited clips and told myself I'd make a yearly recap video.
I opened the folder. I looked at the files. And then I did what every engineer does when they should be editing.
I started overengineering.
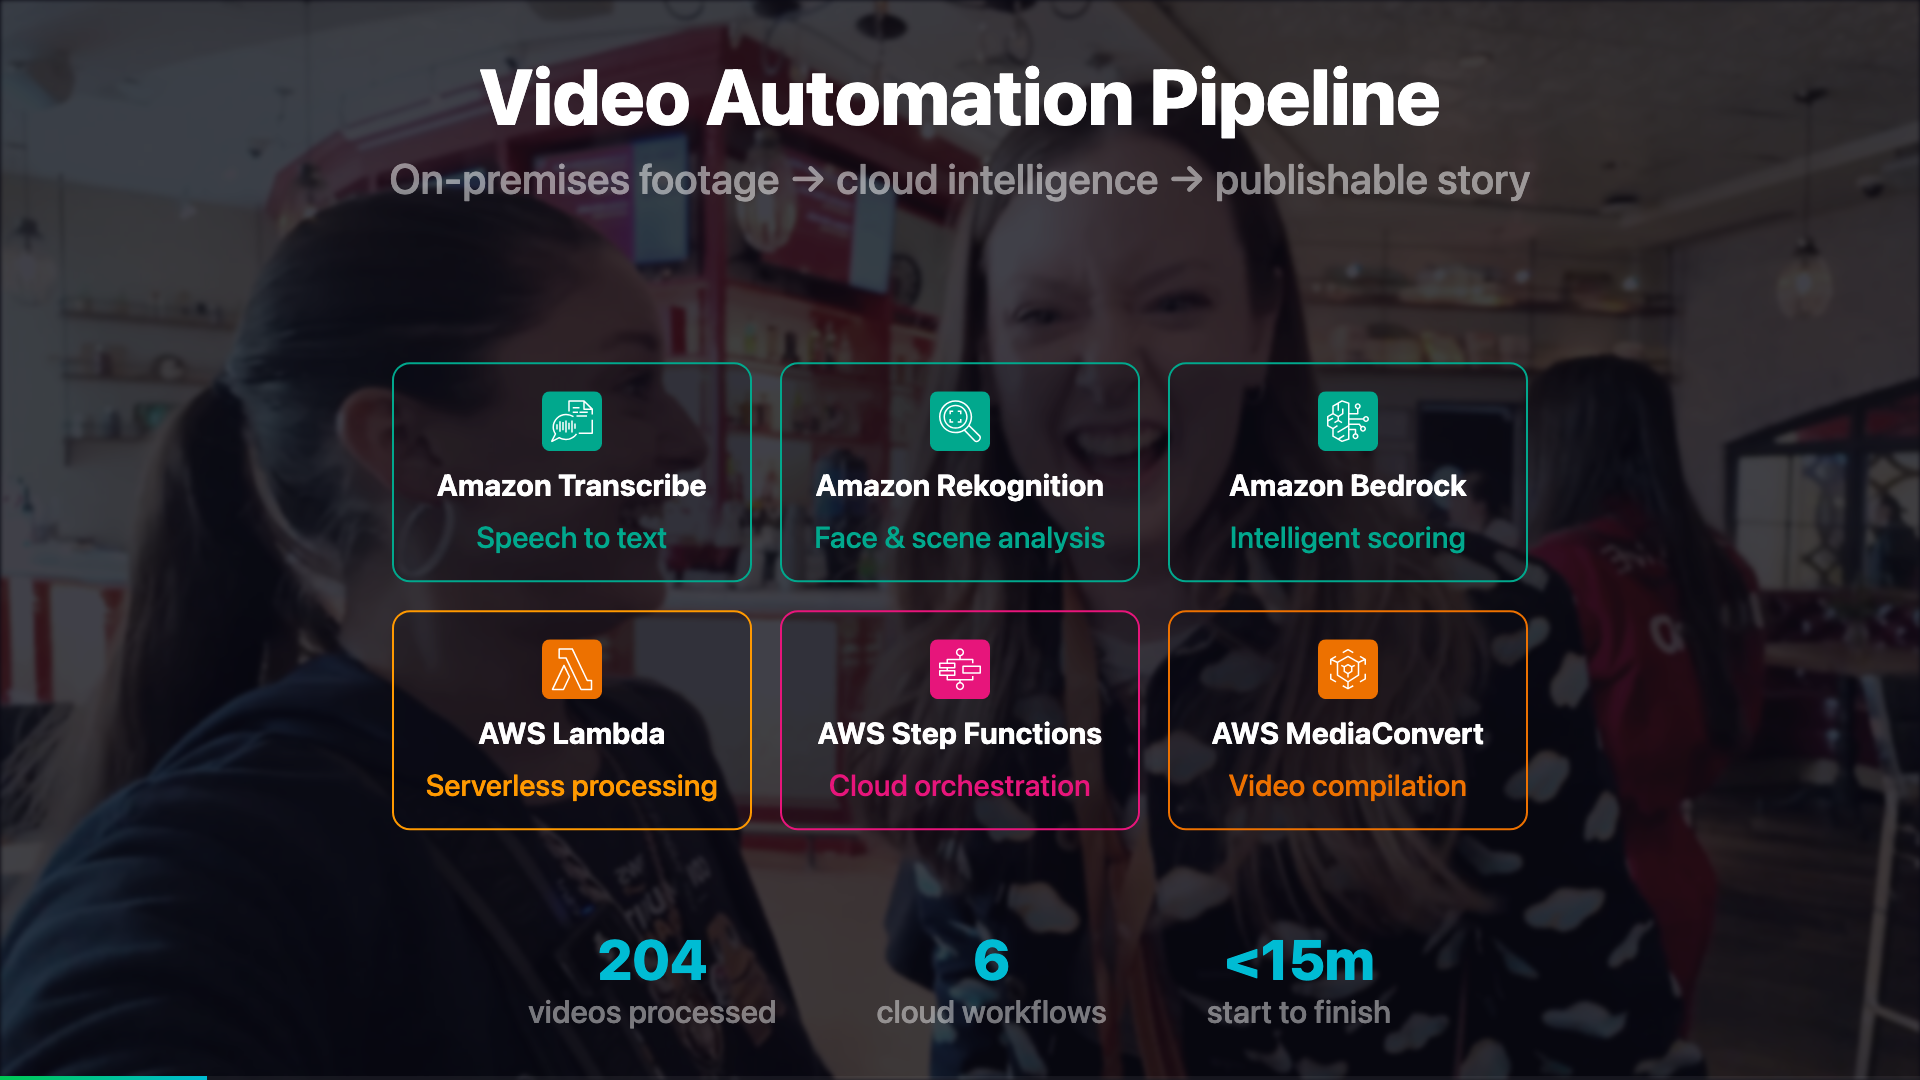
Three months later: four new enterprise customers, two new partnerships, an AI pipeline that processes a raw conference video in under three minutes for ~€0.34 per processed clip, and an open-source project I'm close to shipping. This is that story.
The Problem Nobody Talks About
Video production has two phases everyone knows about: filming and publishing. The phase that kills most projects is the one in the middle - post-production.
For a one-hour interview, industry standard is 40-60 hours of editing. At a conference like re:Invent, where a single sponsor might film 50 interviews in three days, that number becomes catastrophic. Most of it never gets published. It sits on a hard drive, or worse, on a NAS system somewhere, untouched.
According to the Wyzowl State of Video Marketing Report, 1 in 5 corporate video projects is published on time. The Cisco Annual Internet Report puts video at 82% of all internet traffic by 2025. These two facts together describe an industry-wide bottleneck.
The content exists. The infrastructure to process it at scale doesn't - or didn't.
This is a storage problem as much as a workflow problem. Petabytes of unstructured video data live on enterprise NAS systems. Valuable content, invisible because there's no way to search, tag, or publish it efficiently.
Architecture Overview
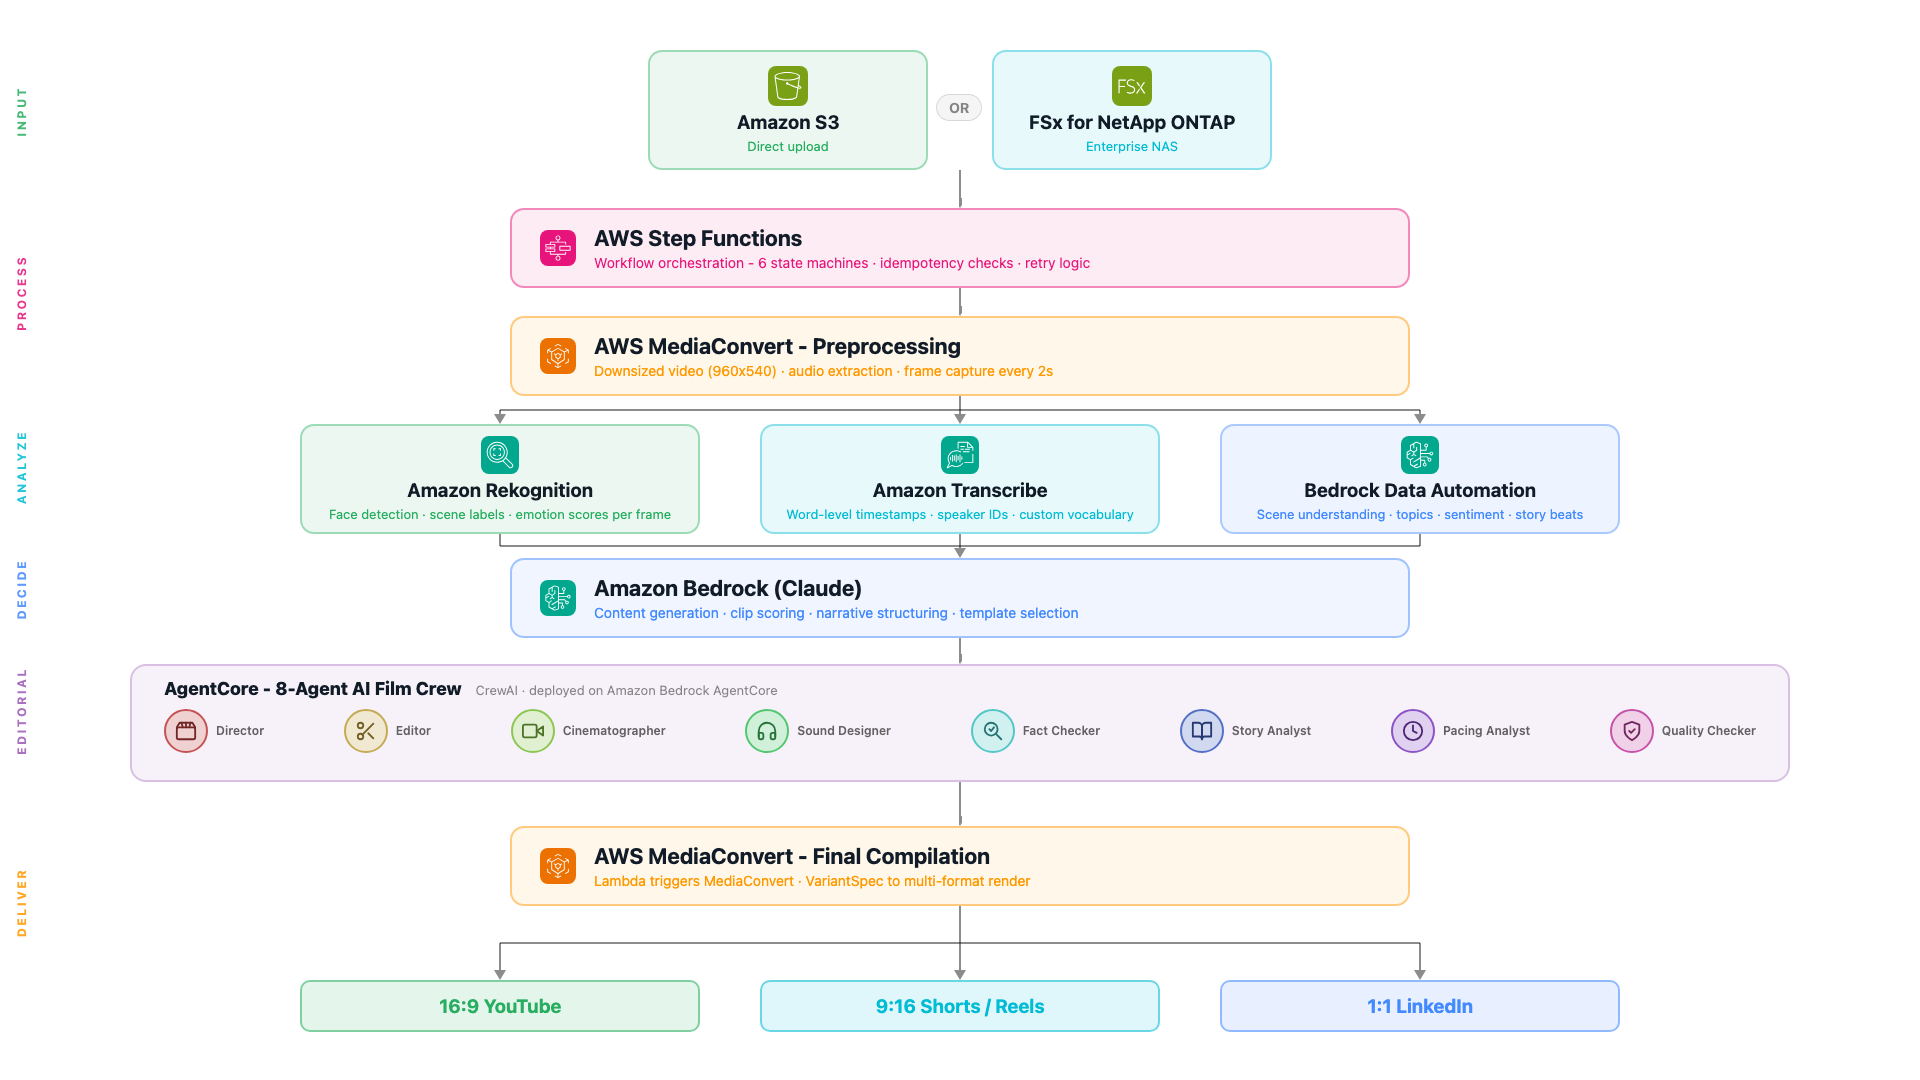
The system has three conceptual layers: an intake layer that handles validation, an analysis layer that extracts everything machine-readable, and a creative layer that makes editorial decisions - which clips to use, in what order, with what structure.
The Fully Cloud Version
Step Functions: Orchestration You Can See
Most pipelines start as a chain of Lambda functions calling each other. That works until something fails at 2am and you have no idea which step broke, what the input was, or whether it retried. Step Functions solves this by making the workflow a first-class object with full visibility.
You write your workflow in Amazon States Language (ASL) - a JSON format where each step is a state. AWS then renders that JSON as a visual graph in the console. You write code and immediately see the flow. When something fails, the console shows you exactly which state failed, what input it received, and what the error was. No log hunting. The full ASL reference is in the Step Functions documentation.
What is AWS Step Functions?
A serverless orchestration service that connects Lambda functions, AWS SDK calls, and other services into a visual workflow. Each execution is tracked individually - full input, output, and error history per step, no log hunting. You can build workflows visually in the console (drag-and-drop, no JSON needed), or write the JSON directly and version-control it. CDK, CloudFormation, and SAM all work too.
Docs: Step Functions overview · Amazon States Language reference · SDK integrations (all supported services).
There are four state types this pipeline uses constantly:
| Task | Do something - invoke a Lambda, call an AWS service directly, start a job |
| Choice | Branch based on a value in the execution context - like an if/else |
| Wait | Pause for a fixed time - useful for polling async jobs without burning Lambda time |
| Parallel | Run multiple branches simultaneously and wait for all of them to finish |
SDK integration: calling AWS services without a Lambda
One of the most useful Step Functions features is that you can call AWS SDK APIs directly from a Task state - no Lambda function needed. The resource ARN always follows the same pattern: arn:aws:states:::aws-sdk:{service}:{action}. The service name and action names come directly from the AWS SDK integrations reference - every supported service is listed there with the exact action names to use. The pipeline uses this for the idempotency check - counting existing outputs in S3 before doing any work:
{
  "Check If Already Processed": {
    "Type": "Task",
    "Resource": "arn:aws:states:::aws-sdk:s3:listObjectsV2",
    "Parameters": {
      "Bucket.$": "$.videoDetails.OutputBucket",
      "Prefix.$": "$.videoDetails.Folder"
    },
    "ResultPath": "$.existingCheck",
    "Next": "Already Processed Decision"
  },
  "Already Processed Decision": {
    "Type": "Choice",
    "Choices": [
      {
        "Variable": "$.existingCheck.KeyCount",
        "NumericGreaterThan": 5,
        "Next": "Skip Already Processed"
      }
    ],
    "Default": "Continue Processing"
  }
}
The .$ suffix on parameter names means the value is read from the execution context - the live data flowing through the workflow. ResultPath controls where the S3 response is stored in that context so the next state can read it. If 5 or more output files already exist, the workflow skips entirely - safe to re-trigger without paying for reprocessing.
Running things in parallel
After preprocessing, Rekognition, Transcribe, and BDA all run at the same time. The Parallel state branches execution and waits for all three before continuing:
{
  "Run Analysis": {
    "Type": "Parallel",
    "Branches": [
      { "StartAt": "Rekognition Frame Analysis",  "States": { ... } },
      { "StartAt": "Transcribe Audio",            "States": { ... } },
      { "StartAt": "BDA Video Understanding",     "States": { ... } }
    ],
    "Next": "Content Generation"
  }
}
All three complete before the workflow moves to content generation. In practice this cuts the analysis phase from ~3 minutes sequential to under 90 seconds.
MediaConvert: Three Outputs, One Job
What is AWS Elemental MediaConvert?
A file-based video transcoding service. You give it a source video and a job spec describing what outputs you want - different resolutions, codecs, audio tracks, frame captures - and it produces them all in one job without you managing any servers. The job spec is JSON you configure once and reuse. A good starting point is the MediaConvert console where you can build a job interactively and export the JSON template.
Every video goes through MediaConvert first. One job creates three outputs simultaneously:
| Downsized video | 960x540, H.264, 1.5 Mbps - base for compilation and BDA input |
| Audio extraction | AAC, 96 kbps - feeds Amazon Transcribe |
| Frame capture | JPEG every 2 seconds, quality 80, max 100,000 frames - feeds Rekognition |
The frame interval is configurable per video type. A fast-moving sports reel needs 0.5-second intervals. A static interview works fine at 3 seconds. The workflow sets this via a Choice state before dispatching to MediaConvert.
Note on 4K source footage: MediaConvert handles the downscale cleanly. But if you use Remotion for preview rendering, always reference the downsized proxy - not the 4K original. A 4K source at 47 Mbps causes delayRender() timeouts because frame seeking takes longer than Remotion's 30-second threshold. The 1080p proxy at ~14 Mbps renders without issues.
The Parallel Analysis Phase
After MediaConvert, three branches run concurrently - Rekognition, Transcribe, and Bedrock Data Automation.
Branch 1: Rekognition - Visual Intelligence Per Frame
What is Amazon Rekognition?
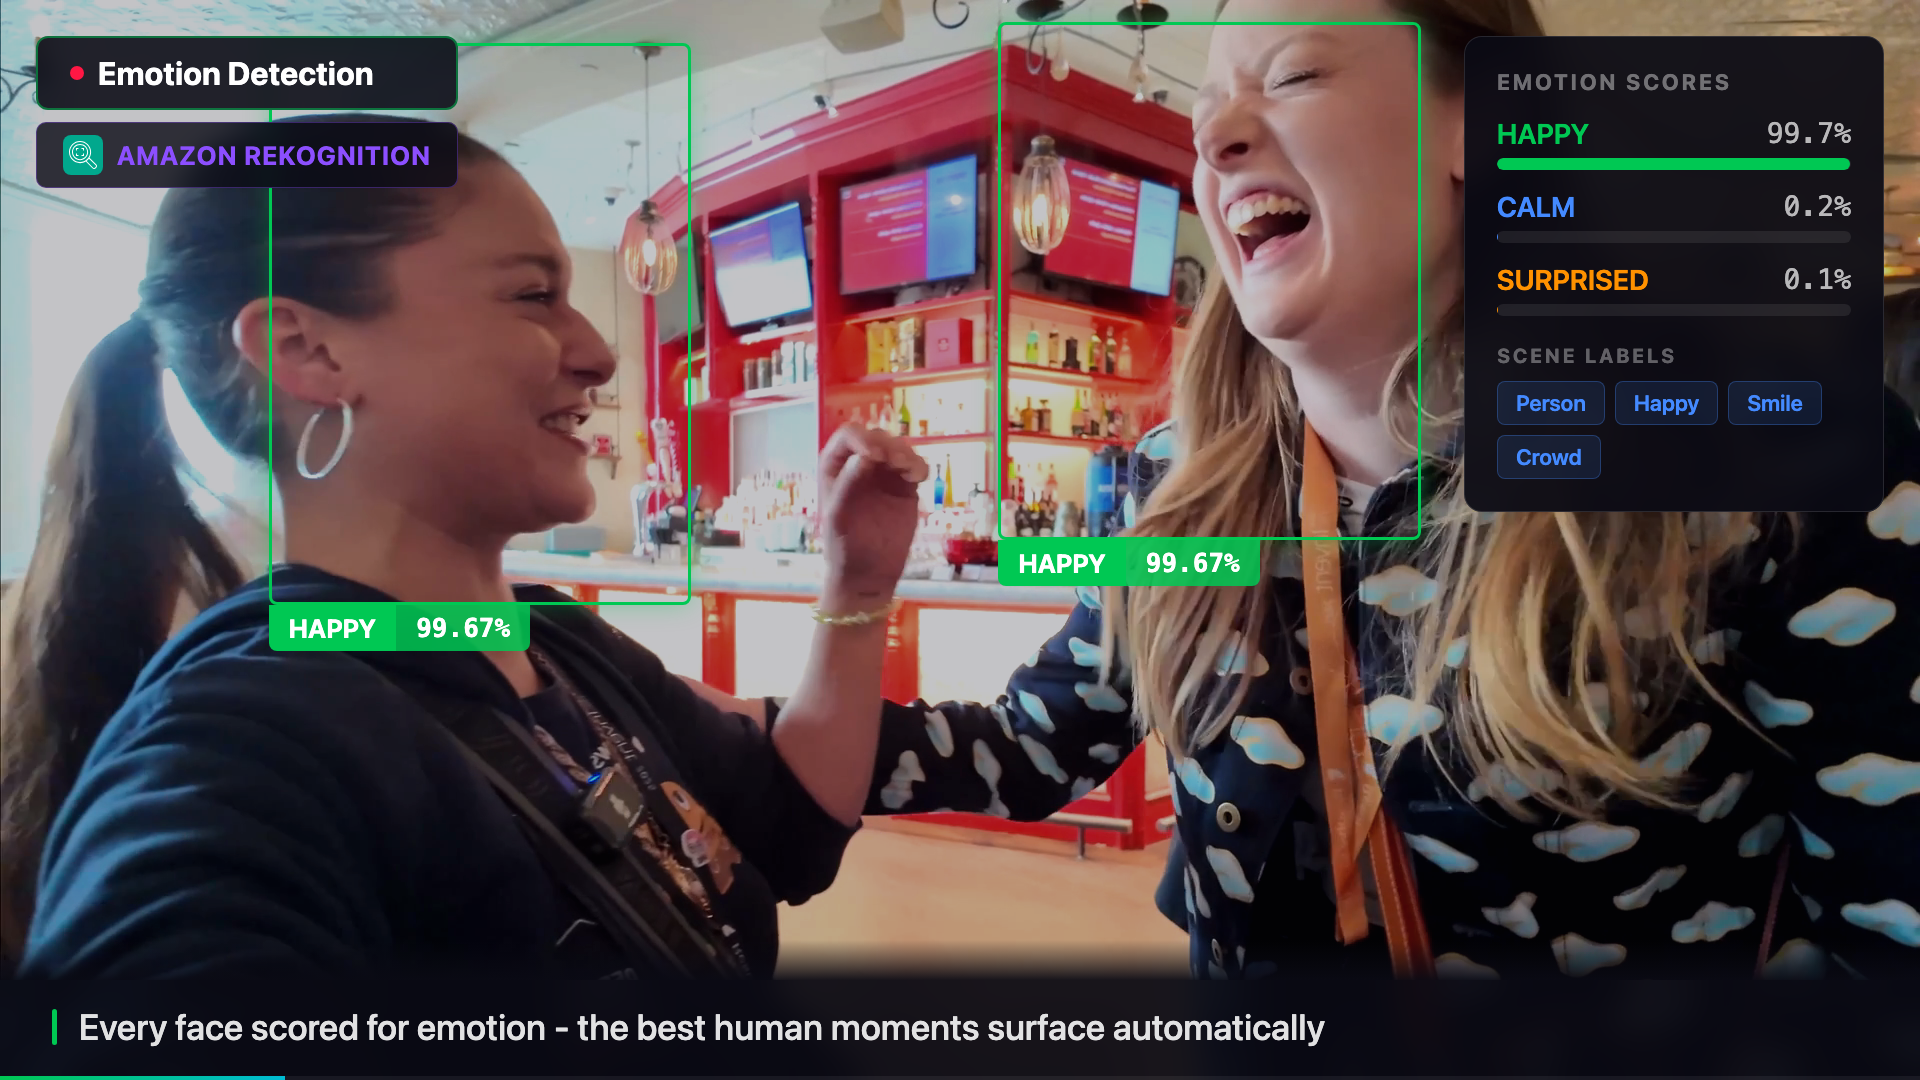
A computer vision service that analyzes images and videos. Point it at an image stored in S3 and it returns what it sees: people, objects, scenes, text, faces - each with a confidence score. You don't train anything, you just call the API. The Rekognition console has a live demo where you can upload any image and see the labels before writing a single line of code - start there.
Each extracted frame is sent to the detect_labels API, which returns what it sees in the image - people, objects, scenes, text - each with a confidence score. The pipeline collects this per frame and aggregates it into a timeline of visual content. Here's the Python/boto3 call:
import boto3

rekognition = boto3.client('rekognition', region_name='eu-central-1')

response = rekognition.detect_labels(
    Image={"S3Object": {"Bucket": "my-bucket", "Name": "frames/frame_0042.jpg"}},
    MaxLabels=20,
    MinConfidence=70,
)

for label in response['Labels']:
    print(f"{label['Name']}: {label['Confidence']:.1f}%")

# Person: 99.2%
# Conference Hall: 94.7%
# Laptop: 88.1%
# Whiteboard: 83.4%
MinConfidence=70 filters out low-confidence detections. The image is referenced directly in S3 - Rekognition reads it from there, so nothing needs to be downloaded to the Lambda first.
The aggregated output tells the film crew: at timestamp 0:32, there's a conference stage with 3 people visible. At 1:14, there's a whiteboard with a diagram. This context shapes which clips the crew selects for different narrative scenes.
The freeze frame below shows the exact moment Rekognition detects faces in the video - the pipeline pauses, draws the detection boxes, and surfaces the confidence scores live.
Branch 2: Transcribe - Word-Level Timestamps
What is Amazon Transcribe?
An automatic speech recognition service that converts audio to text. It returns word-level timestamps, speaker labels, and confidence scores - not just a transcript. You submit a job pointing at an audio file in S3, and the result lands back in S3 when it's done (asynchronous). You can also add a custom vocabulary to handle domain-specific terms your content uses. Start in the Transcribe console to run a test job on any audio file.
Docs: Getting started · Custom vocabulary · StartTranscriptionJob API.
The timestamps matter here - the pipeline needs to know not just what was said but exactly when, so clips can be cut at the right moment.
One problem with technical content: Transcribe doesn't know how to spell "FSxN" or "CrewAI" or "ONTAP". Without help, these come back as "effects en", "crew AI", "on tap". A custom vocabulary fixes this - you register the terms once and Transcribe handles them correctly from that point on. Here's the boto3 call:
import boto3

transcribe = boto3.client('transcribe', region_name='eu-central-1')

# Register domain-specific terms once - reuse across all jobs
transcribe.create_vocabulary(
    VocabularyName='video-pipeline-terms',
    LanguageCode='en-US',
    Phrases=['FSxN', 'ONTAP', 'MediaConvert', 'Rekognition', 'CrewAI', 'AgentCore'],
)

# Start the transcription job - it's async, result lands in S3
transcribe.start_transcription_job(
    TranscriptionJobName='reinvent-interview-001',
    LanguageCode='en-US',
    Media={'MediaFileUri': 's3://my-bucket/audio/interview.aac'},
    OutputBucketName='my-output-bucket',
    Settings={
        'VocabularyName': 'video-pipeline-terms',
        'ShowSpeakerLabels': True,
        'MaxSpeakerLabels': 4,
    },
)
Transcribe is asynchronous - you start the job and poll for completion. The Step Functions workflow handles this the same way it handles BDA: a Task that checks status, a Choice that branches on the result, and a Wait that loops back. The same polling pattern applies to any async AWS job.
A transcription enhancer Lambda runs after the job completes. It uses Bedrock to clean up filler words, standardise speaker labels, and fix any remaining technical terms the vocabulary missed.
Branch 3: Bedrock Data Automation (BDA) - Video-Level Understanding
What is Amazon Bedrock Data Automation?
A service that processes documents, images, audio, and video files and extracts structured information from them - without you having to write extraction logic. For video it returns scenes, speakers, topics, sentiment, and key moments as structured JSON. Unlike Rekognition (which analyzes individual frames) or Transcribe (which only processes audio), BDA understands the video as a whole. It runs asynchronously: you submit a job, get back an invocation ARN, and poll for completion.
BDA runs directly on the downsized video file. The Step Functions workflow starts the job, then uses a Task/Choice/Wait polling loop to check status - the same pattern as Transcribe and any other async AWS service. Here's the polling loop in ASL:
"Get BDA Status": {
  "Type": "Task",
  "Resource": "arn:aws:states:::aws-sdk:bedrockdataautomationruntime:getDataAutomationStatus",
  "Parameters": {
    "InvocationArn.$": "$.bdaInvoke.InvocationArn"
  },
  "ResultPath": "$.bdaStatus",
  "Next": "BDA Decide"
},
"BDA Decide": {
  "Type": "Choice",
  "Choices": [
    {"Variable": "$.bdaStatus.Status", "StringEquals": "Success",     "Next": "BDA Done (Success)"},
    {"Variable": "$.bdaStatus.Status", "StringEquals": "ClientError", "Next": "BDA Done (Error)"},
    {"Variable": "$.bdaStatus.Status", "StringEquals": "ServiceError", "Next": "BDA Done (Error)"}
  ],
  "Default": "Wait BDA 10s"
},
"Wait BDA 10s": {
  "Type": "Wait",
  "Seconds": 10,
  "Next": "Get BDA Status"
}
No Lambda needed for the status check - Step Functions calls the BDA runtime API directly using the same SDK integration pattern. The workflow checks status, branches on the result, and if not done yet it waits 10 seconds and loops back. Nothing is running during the Wait state - Step Functions pauses the execution entirely, which means no compute cost while waiting. This same Task/Choice/Wait polling loop is the standard pattern for any async AWS service: Transcribe, MediaConvert, Textract, and more. Once you understand the pattern once, you can apply it anywhere.
Content Generation with Amazon Bedrock
What is Amazon Bedrock?
A managed service that gives you access to foundation models from multiple providers through a single API - Amazon Nova, Anthropic Claude, Meta Llama, Mistral, and others. You don't manage any infrastructure. First go to Bedrock console › Model access and enable the models you want - they are not all on by default. Each model has an ID you copy from there and use in your API calls. Two things to check when picking a model for a pipeline like this: (1) context window - a full video transcript can be 10,000+ tokens; some models cap at 4K so the whole thing won't fit. Claude and Nova Pro both support 100K+ tokens. (2) request body format - each model family has slightly different JSON structure; the exact format for each is in the Bedrock inference docs. Start with the Bedrock console playground to test prompts interactively before writing any code.
Full reference: Bedrock overview · All model IDs.
Once all three analysis branches complete, a Lambda calls Bedrock with a structured prompt - the transcription, the Rekognition visual timeline, and the BDA story summary all combined. The boto3 call is the same regardless of which model you pick - only the modelId and request body format change:
import boto3, json

bedrock = boto3.client('bedrock-runtime', region_name='eu-central-1')

# modelId: copy from Bedrock console > Model access, or from the model IDs docs
response = bedrock.invoke_model(
    modelId='<your-model-id>',
    body=json.dumps(request_body),   # format depends on the model family
)

result = json.loads(response['body'].read())
# parse result according to the model's response format (see docs)
The easiest way to get started is the Bedrock console playground - you can test prompts against any model interactively before writing a single line of code. Once you know which model and prompt works, copy the model ID and translate it into a boto3 call.
The prompt this pipeline sends includes everything the three analysis branches collected:
prompt = f"""
You are a professional video editor reviewing footage.

TRANSCRIPTION:
{transcription_text}

VISUAL TIMELINE (Rekognition labels per timestamp):
{json.dumps(visual_timeline, indent=2)}

STORY ANALYSIS (BDA):
{bda_summary}

Generate a JSON response with:
- title: A compelling video title (max 80 chars)
- summary: 2-sentence description of the content
- key_elements: List of the most important topics, people, and moments
"""
The model returns structured JSON. The pipeline validates it against domain models before passing it downstream. No fallback data is ever generated - if the model returns invalid JSON, the workflow fails with a clear error rather than propagating synthetic content.
The Film Crew: 8 AI Agents Making Editorial Decisions
What is Amazon Bedrock AgentCore?
A managed runtime for deploying and running AI agents at scale without managing servers. You package your agent logic - in this case a CrewAI crew - as a container, deploy it to AgentCore, and invoke it via API. AgentCore handles scaling, retries, and logging. It's designed for agents that need to run complex multi-step reasoning with tool use.
Docs: AgentCore overview.
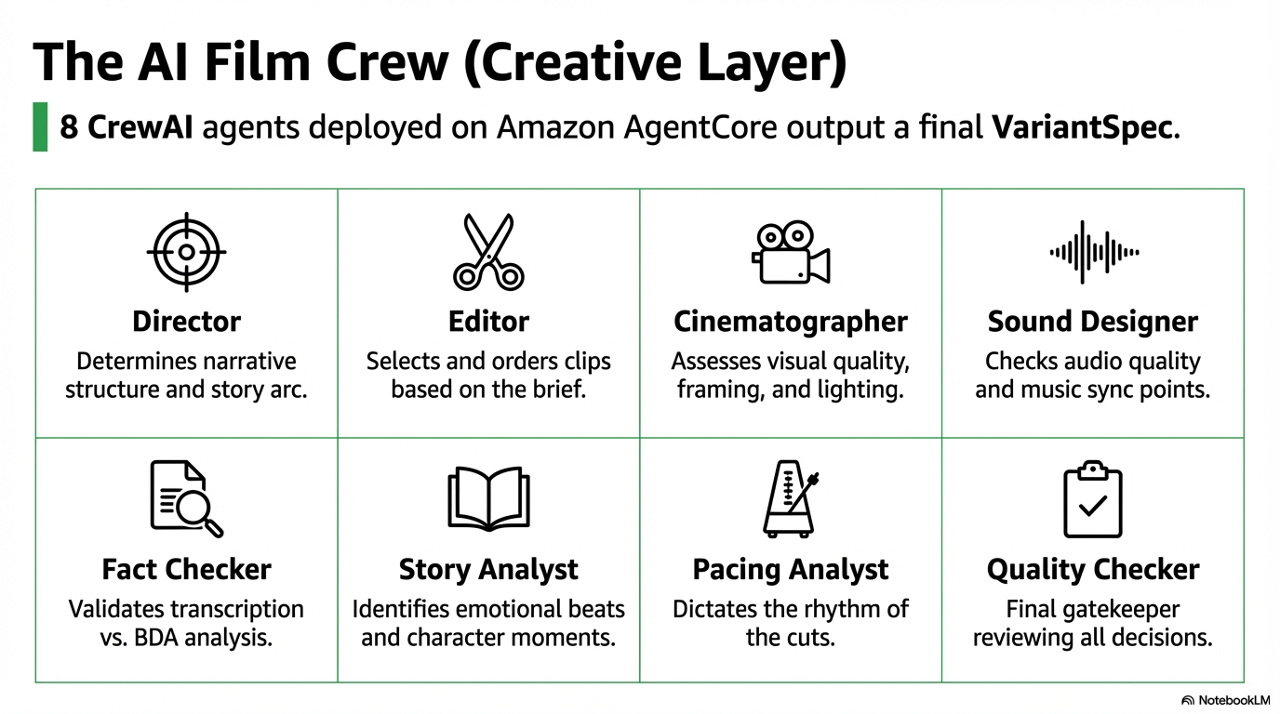
The most interesting part of the pipeline is what happens after content generation. A CrewAI crew of eight agents - deployed to Amazon AgentCore - reviews the analysis results and makes the actual editorial decisions.
| Agent | Responsibility |
|---|---|
| Director | Narrative structure - which story to tell, what the arc should be |
| Editor | Clip selection and ordering based on the Director's brief |
| Cinematographer | Visual quality assessment - framing, composition, lighting |
| Sound Designer | Audio quality, ambient noise, music sync points |
| Fact Checker | Validates transcription accuracy, flags potential misinformation |
| Story Analyst | Identifies narrative arcs, emotional beats, character moments |
| Pacing Analyst | Edit rhythm - when to cut fast, when to let a moment breathe |
| Quality Checker | Final gate before compilation - reviews all other agents' decisions |
The crew is triggered by film_crew_trigger, a Lambda that builds the payload and invokes AgentCore.
# film_crew_trigger/handler.py
def build_crew_payload(analysis_results: dict, clips: list, ...) -> dict:
return {
"bucket": output_bucket,
"analysis_id": analysis_id,
"template_type": template_type,
"clips": clips,
"video_contexts": video_contexts,
"adaptive_mode": adaptive["mode"],
# CRITICAL: pass the full dict, never extracted fields
"analysis_result": analysis_results,
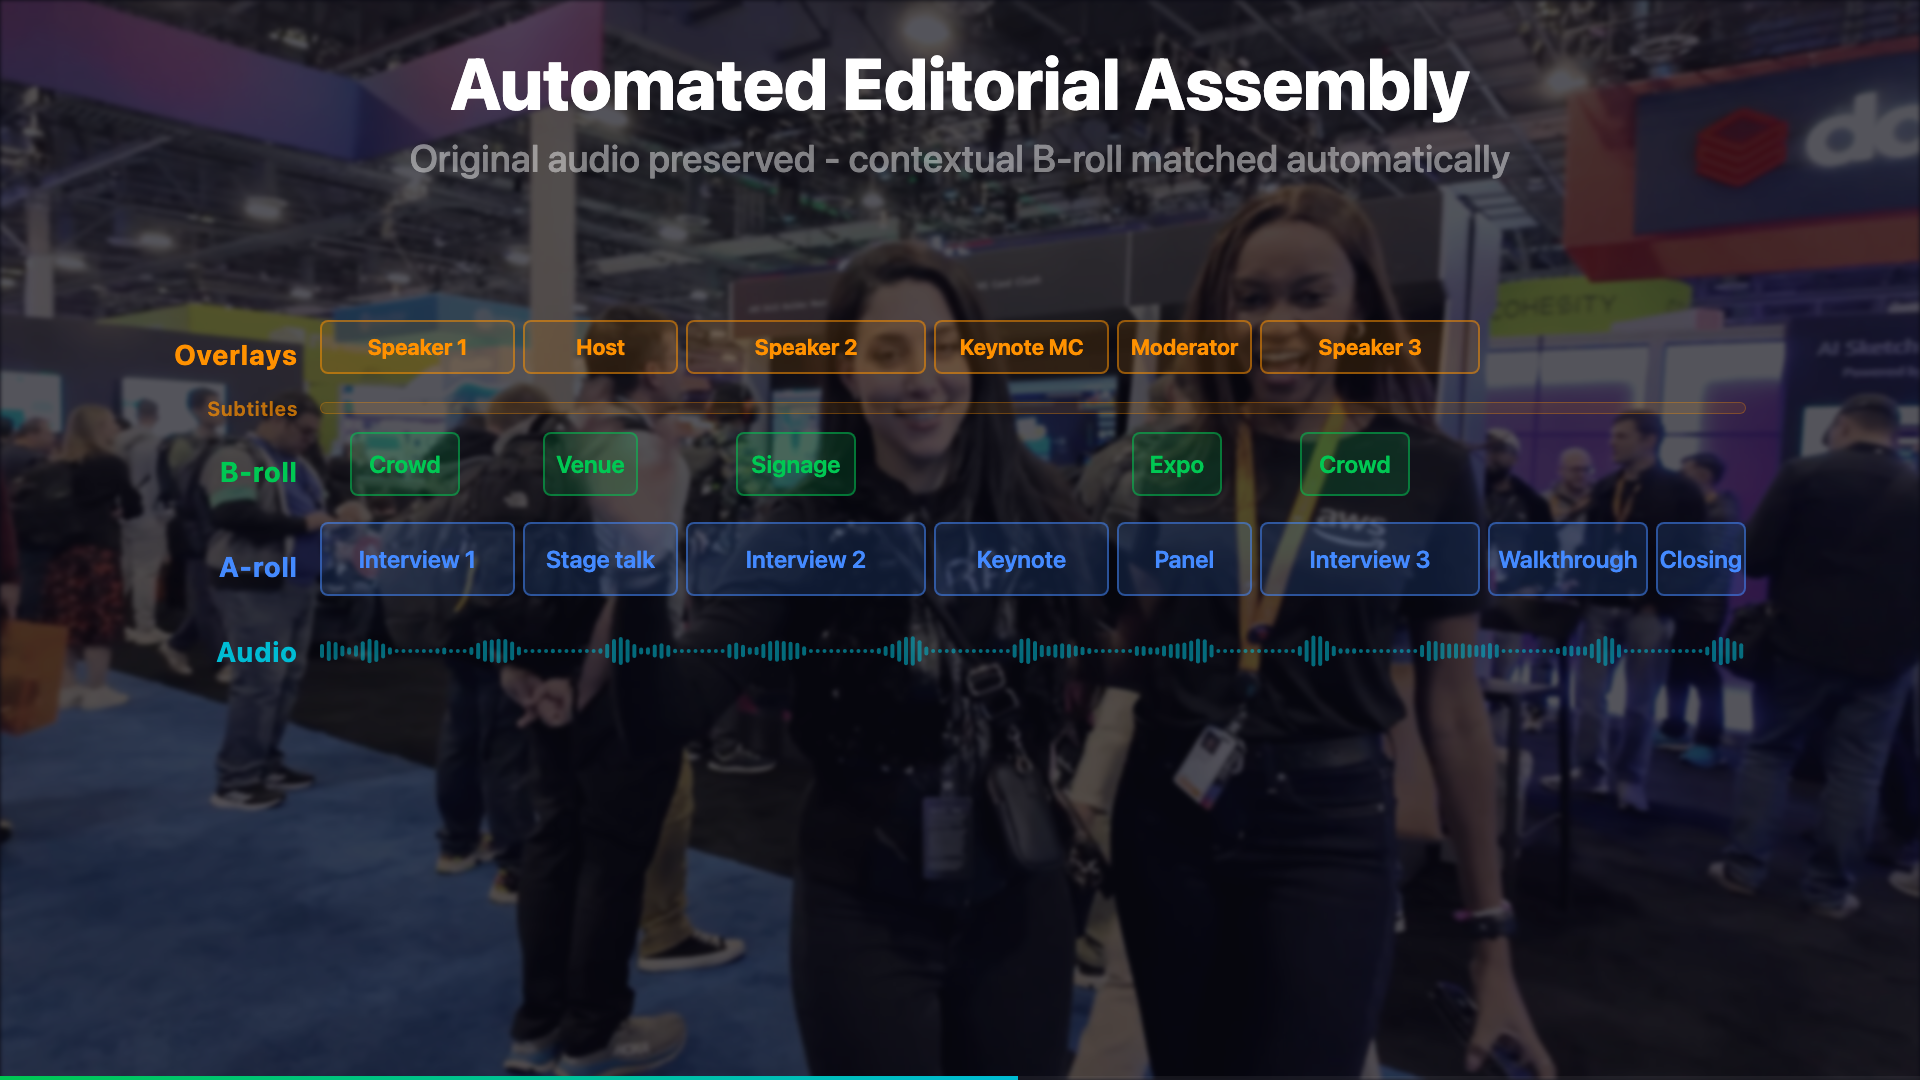
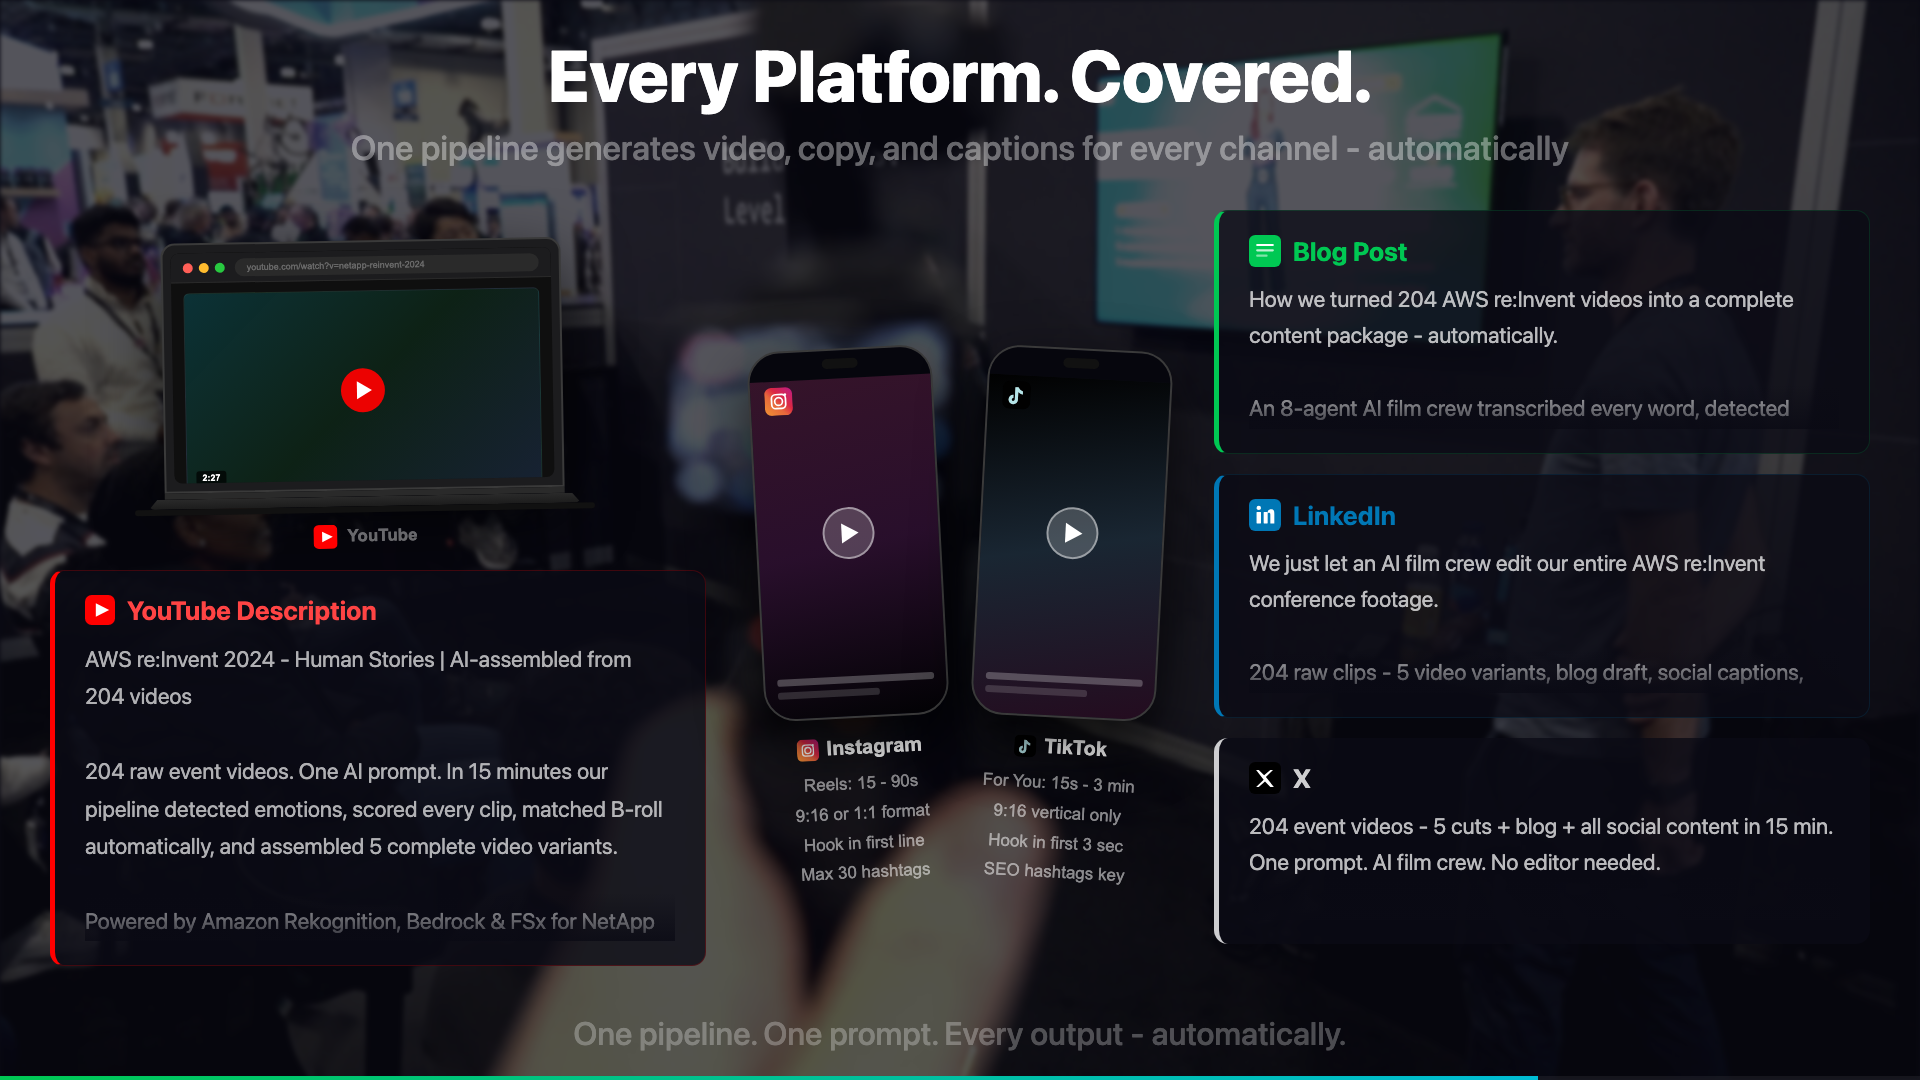
}The crew outputs a VariantSpec - a structured description of the final video: which clips to include, in what order, with what transitions, and for which output format. The compilation Lambda reads this spec and calls MediaConvert to produce the final output in three aspect ratios: 16:9 (YouTube), 9:16 (Shorts/Reels), and 1:1 (LinkedIn).
The FSxN Version: Enterprise Archives at Scale
The fully-cloud version assumes video files start in S3. The enterprise version - built for NetApp customers - starts from a different premise: the footage already exists, at petabyte scale, on a NetApp ONTAP NAS system.
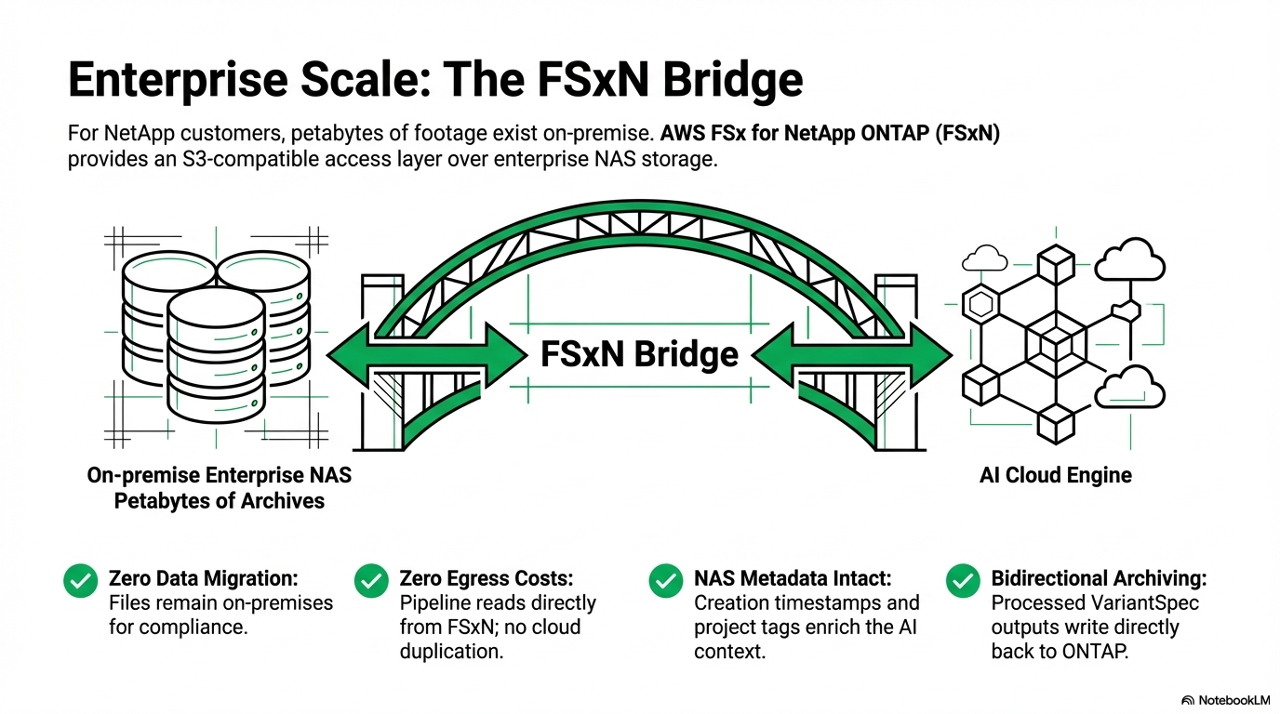
FSx for NetApp ONTAP provides an S3-compatible access layer over enterprise NAS storage. This is what makes the pipeline possible without moving petabytes of footage into S3 first:
| No full data migration | Source files stay on the NAS where compliance requires them - only the derivatives land in S3 |
| Reduced egress costs | MediaConvert reads the source from FSxN directly - no need to copy the full archive to S3 first |
| Full NAS metadata access | Creation timestamps, folder structure, project tags - all enriching pipeline context |
| Bidirectional | Processed outputs can write back to ONTAP for archiving alongside the originals |
Where S3 is still required
The pipeline has two buckets with different roles: an input_bucket (the source, which can be FSxN) and an output_bucket (where all processed artifacts land). The output bucket must be a standard S3 bucket, regardless of where the source video lives. Rekognition, Transcribe, and BDA all reference objects in standard S3 - they cannot read from FSxN directly.
This means the architecture for the FSxN version is: read source from FSxN - create all intermediates in S3 - run analysis against S3:
FSxN (source video)
  └─ MediaConvert reads via S3 access point
       └─ output_bucket/processed/{key}/downsized/  <-- standard S3
       └─ output_bucket/processed/{key}/audio/       <-- Transcribe reads from here
       └─ output_bucket/processed/{key}/frames/      <-- Rekognition reads from here
       └─ output_bucket/processed/{key}/bda-analysis/ <-- BDA output
Depending on how FSxN is set up, there may be additional configuration needed. If the FSxN volume is exposed as an S3 access point in the same AWS account, MediaConvert and the Lambdas can reference it using a standard bucket parameter. If the setup uses a different access method (NFS mount, custom endpoint), the Lambda code that reads source files needs adjusting to match.
What doesn't change at all: the analysis phase. Everything after MediaConvert runs identically whether the source came from FSxN or a standard S3 bucket - because by that point, all the derivatives are already in S3.
"Find all interviews where our journalists mentioned climate policy between 2020 and 2025, and produce a highlights reel."
A broadcaster with 20 years of archived footage can now run queries like this. The pipeline indexes the archive via Rekognition + Transcribe + BDA, stores the results, and makes the content searchable. The editing happens automatically.
Economics at Enterprise Scale
A broadcaster processing 10,000 videos per month pays approximately:
| Service | Cost per video | Monthly (10,000 videos) |
|---|---|---|
| MediaConvert | ~€0.09 | ~€900 |
| Amazon Transcribe | ~€0.11 | ~€1,100 |
| Amazon Rekognition | ~€0.07 | ~€700 |
| Amazon Bedrock | ~€0.05 | ~€500 |
| Step Functions | ~€0.01 | ~€100 |
| AgentCore | ~€0.01 | ~€100 |
| Total | ~€0.34 | ~€3,400 |
For context: a single human editor costs more per month than the entire pipeline costs per 10,000 videos. The pipeline doesn't replace editors - it handles the 80% of footage that would never be touched otherwise.
Anti-Hallucination: Why 6 Validation Layers
AI pipelines in production video fail in a specific way: they produce confident-sounding but incorrect output. A transcription error in a political interview becomes a fabricated quote. A Rekognition misidentification causes a story that wasn't there.
| 1 | Input validation - FileSanitizer checks codec, container, duration, and orientation before any analysis runs |
| 2 | Clip validation - does the timestamp exist? Is the duration non-zero? Does the content match the label? |
| 3 | Timestamp validation - clips are cross-referenced against source video duration; no clip can end after the video ends |
| 4 | Fact checking - the FactChecker agent compares transcription content against BDA analysis; discrepancies trigger a review flag |
| 5 | Quality checking - the QualityChecker agent runs final checks on clip selections, transition points, and narrative coherence |
| 6 | Output validation - the final VariantSpec is validated against the domain model schema before compilation starts |
@dataclass
class Clip:
    source_video: str
    start_time: float   # seconds from start of source video
    duration: float     # clip length in seconds

    @property
    def end_time(self) -> float:
        return self.start_time + self.duration

    def validate(self) -> tuple[bool, str | None]:
        if not self.source_video:
            return False, "Clip missing source_video"
        if self.start_time < 0:
            return False, f"Invalid start_time: {self.start_time}"
        if self.duration <= 0:
            return False, f"Invalid duration: {self.duration}"
        return True, None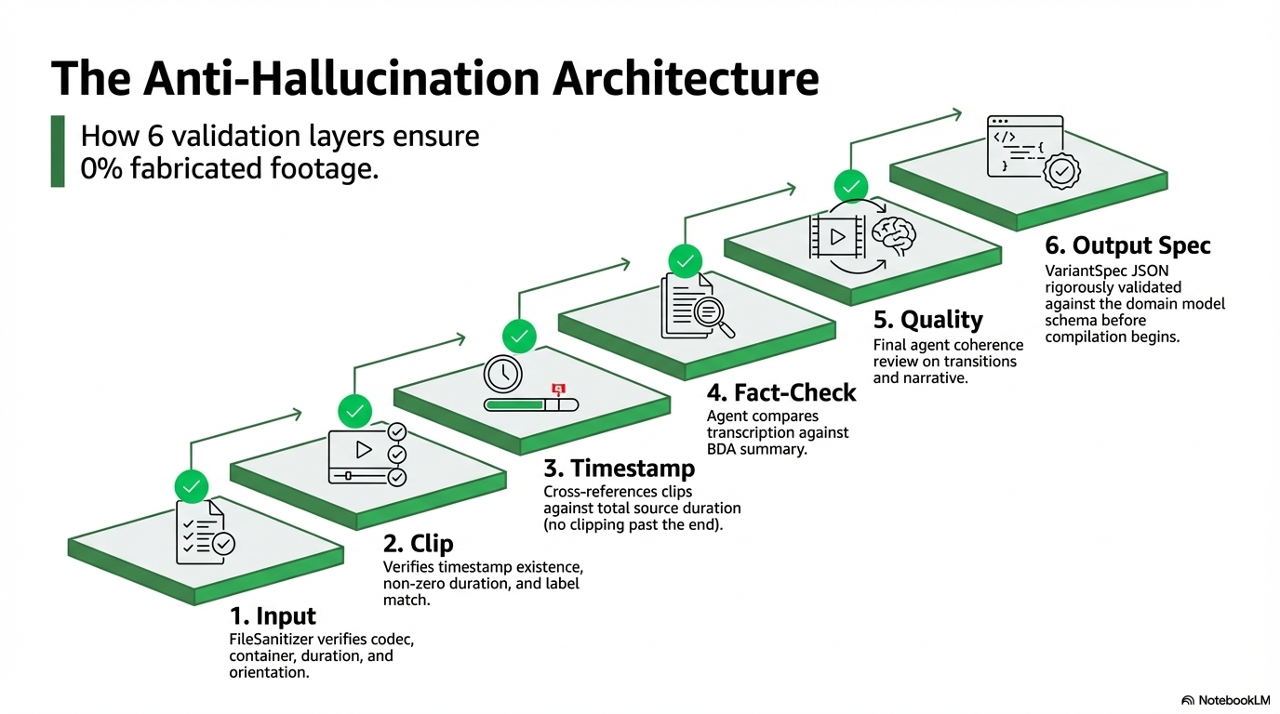
Observability: When Things Go Wrong at 2am
A production pipeline that processes customer footage needs clear observability. Three tools matter.
Step Functions execution console - The single best debugging tool. Every state transition is logged with input and output. When a Lambda fails, the exact error is visible inline. When the BDA polling loop runs 40 times before timing out, you can see each iteration.
CloudWatch Lambda Insights - Duration, memory usage, and cold start frequency per function. The frame_object_detector Lambda benefits most from provisioned concurrency because Rekognition calls are time-sensitive and cold starts add 800ms-1.2s.
Custom log tail for AgentCore - AgentCore runs in us-east-1 while the main pipeline runs in eu-central-1. Cross-region log access is easy to forget when debugging. The tail script handles region switching automatically.
bash scripts/tail-agentcore-logs.sh

bash scripts/monitor-workflow.sh <execution-arn>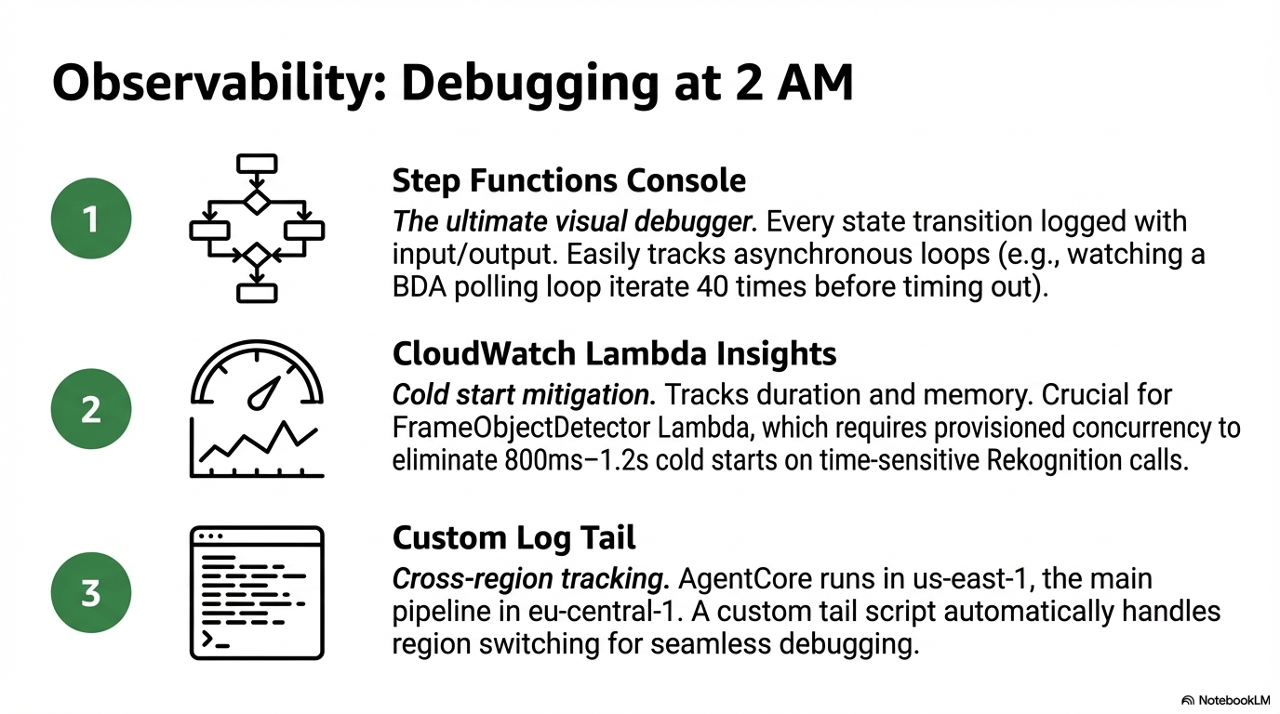
What I'd Do Differently
Keyframe extraction instead of frame-per-second sampling
The current approach extracts one frame every 2 seconds. A 3-minute video produces ~90 frames. Most of them are near-identical. A keyframe extractor using scene change detection would produce 15-20 meaningful frames at far lower Rekognition cost.
# FFmpeg scene change detection - outputs only frames where the scene changes
ffmpeg -i input.mp4 \
  -vf "select=gt(scene\,0.3)" \
  -vsync vfr \
  frames/keyframe_%04d.jpg
Vector search for archive querying
The current pipeline processes video on demand. An enterprise archive version needs search before processing - find the relevant footage first, then run the deep analysis. Storing Rekognition and Transcribe results as embeddings in OpenSearch would make "find all clips of our CEO from 2024" a sub-second query rather than a batch job.
Streaming compilation status
The current architecture produces the final video asynchronously. For a human editor reviewing results, a real-time status stream via WebSocket or Server-Sent Events would dramatically improve the workflow. The editor could reject the Director's narrative choice before compilation starts rather than after waiting 90 seconds.
Closing
The first version of this pipeline existed because I had 493 unedited clips and no patience for manual editing. The production version exists because that problem scales - every company with a video team has a version of the same backlog.
The technical architecture is interesting. The AI film crew is novel. But the actual value is simpler: footage that would never be published now gets published. A journalist's best interview from a conference three years ago becomes findable, taggable, and distributable in minutes.
That's the problem worth solving.

Reproducibility: Deploy It Yourself
The entire pipeline - 27 Lambda functions, 6 Step Functions workflows, IAM roles, S3 policies - is managed with Terraform. If you've not used Terraform before, it works in three commands:
terraform init    # download providers and set up the backend
terraform plan    # preview every change before it happens - nothing is applied yet
terraform apply   # apply the changes, with a confirmation prompt
plan is the most important habit. It shows you exactly what will be created, changed, or destroyed before touching anything. For a pipeline running on customer footage, that preview step matters.
The Makefile wraps these commands with safety checks and environment validation:
make deploy       # runs terraform plan, then apply with confirmation
make autodeploy   # applies without prompts - for CI pipelines
Why Terraform over the console? Because with 27 Lambdas and 6 workflows, clicking through the console once is manageable. Doing it again for a second region, or onboarding a new customer, or rolling back after a bad deploy - that's where IaC pays off. The entire infrastructure is a git clone and a make deploy away from running. Here's what registering one Lambda looks like:
# infra/lambdas.tf
module "content_generator" {
  source = "./modules/lambda_function"

  function_name = "${var.name_prefix}-fn-content-generator"
  source_path   = "../src/lambdas/content_generator"
  handler       = "handler.lambda_handler"
  runtime       = "python3.13"
  timeout       = 900
  memory_size   = 2048

  environment_variables = local.lambda_environment
}
The module automatically bundles src/common/ into every function's zip - shared models, utilities, and config without any duplication. All 27 Lambdas are registered the same way.
To run the test suite against real AWS services:
make test       # ~2-3 minutes, costs ~€0.05

make test-full  # ~10-15 minutes, costs ~€2-3
The test scripts use real AWS services - there's no mock infrastructure. This is intentional. Mock tests passed when the production migration failed. Real tests are the only tests that matter for a pipeline this dependent on service integration.
The full Terraform infrastructure and pipeline source will be released as open source soon. I'm finishing the last details - follow along on LinkedIn or GitHub for the release.
Further Reading
Official AWS documentation for the services used in this pipeline:
| Amazon Transcribe Automatic speech recognition with custom vocabulary and word-level timestamps |
Amazon Rekognition Image and video analysis - labels, faces, objects, scenes, and text |
| Amazon Bedrock Foundation models - Nova, Claude, Llama and more. Start with the model IDs docs to find available models. |
Amazon Bedrock AgentCore Managed runtime for deploying and scaling AI agent workloads |
| AWS Elemental MediaConvert File-based video transcoding for broadcast and multi-screen delivery |
AWS Step Functions Visual workflow orchestration for distributed applications |
| AWS Lambda Serverless compute - run code without provisioning or managing servers |
FSx for NetApp ONTAP Fully managed ONTAP file system with S3-compatible access on AWS |
| CrewAI Open-source framework for orchestrating multi-agent AI crews |
|
Linda Mohamed is an AWS Hero and cloud architect based in Vienna. She builds AI-powered media systems and speaks at AWS events across Europe. All code referenced in this post is production infrastructure running on AWS.
Connect on LinkedIn · AWS Hero profile · GitHub
